For a printable PDF version, CLICK HERE


For a printable PDF version, CLICK HERE
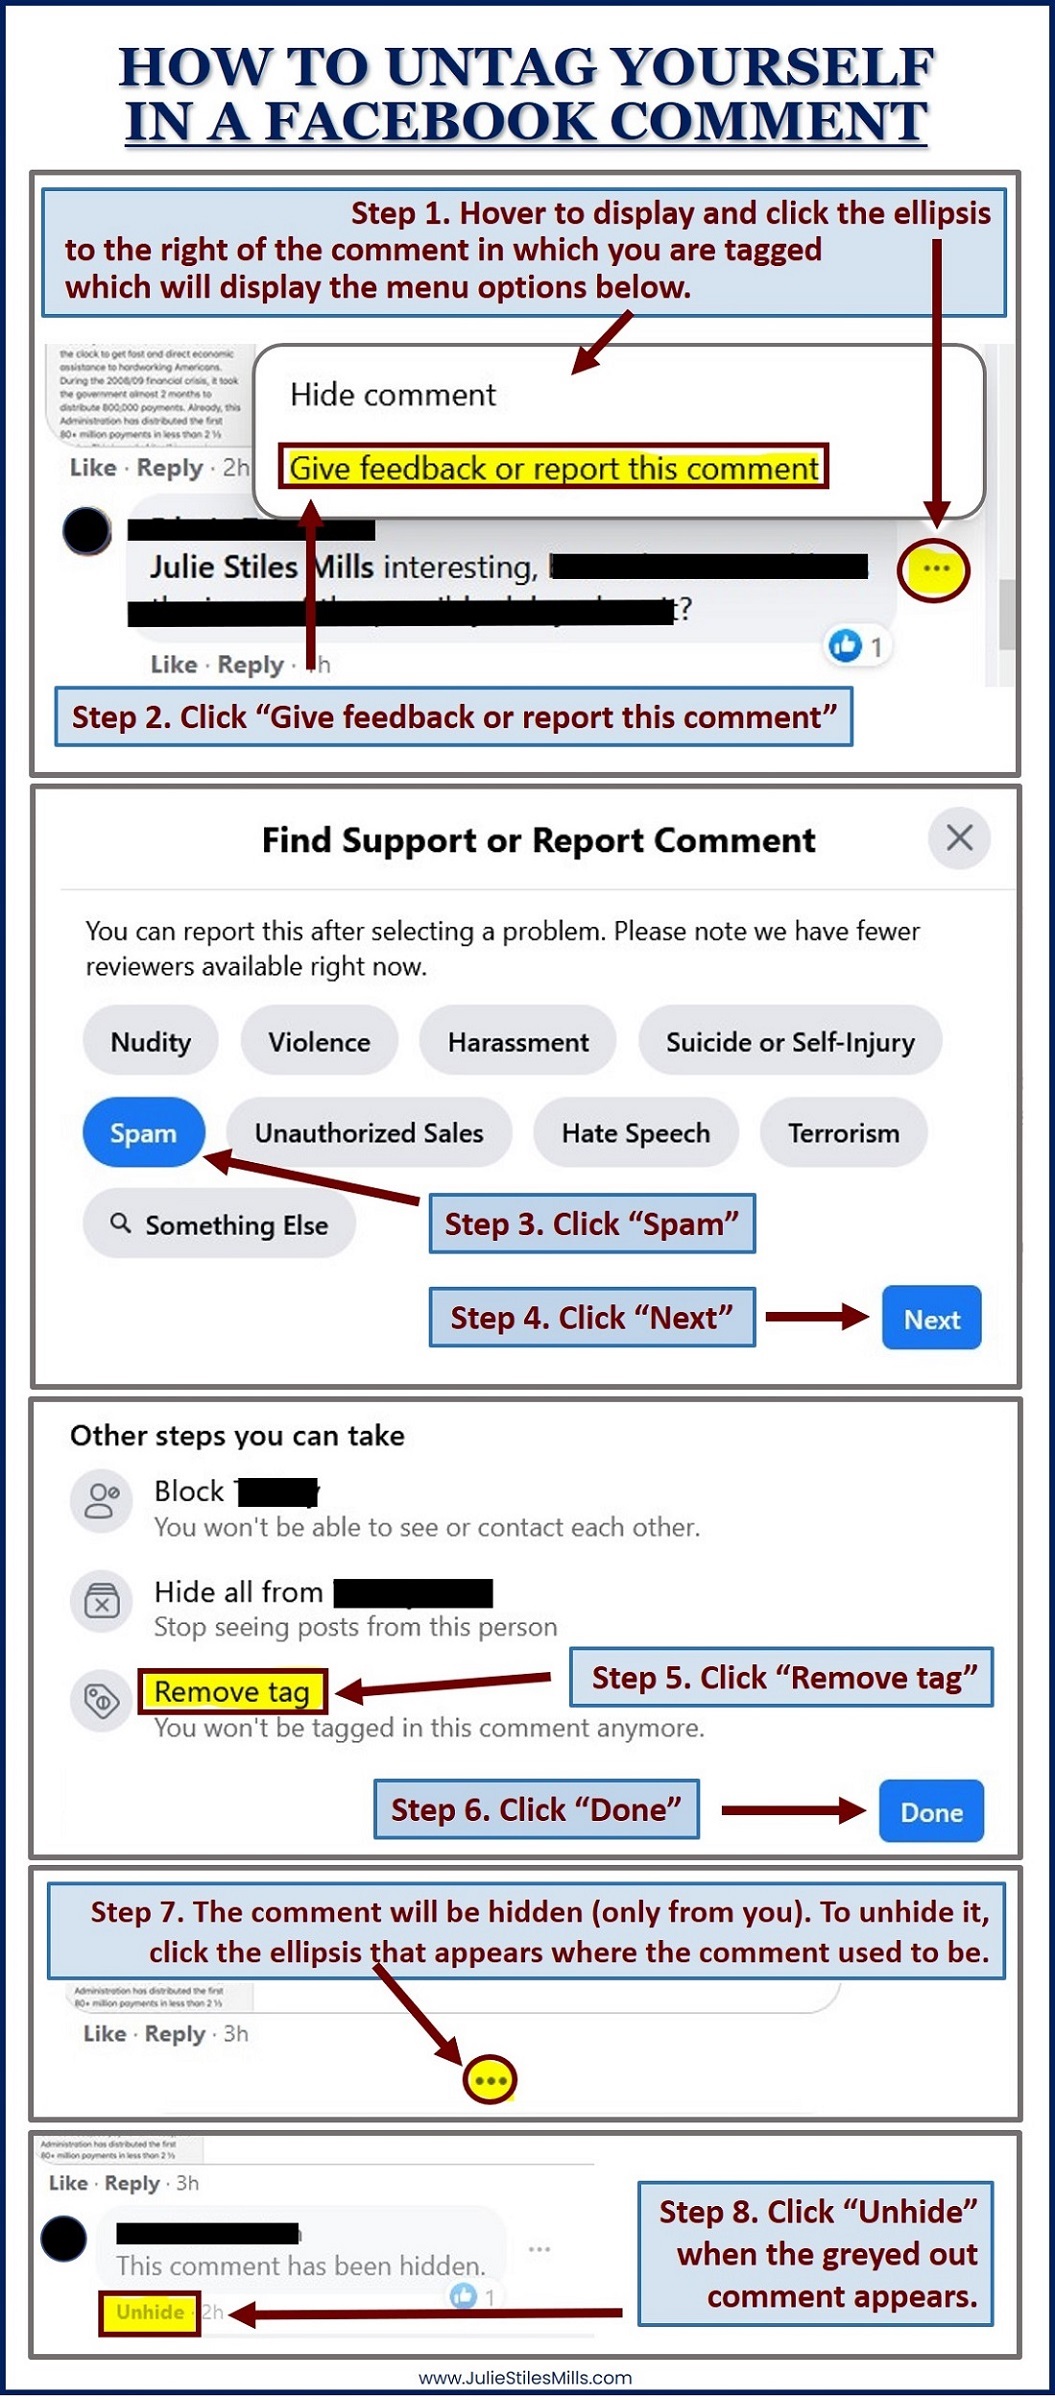
If for some reason, the infographic doesn’t display, here’s the text-based instructions to untag yourself from a Facebook comment in a web browser:
Step 1. Hover to the right of the comment in which you are tagged to display an ellipsis and then click it, which will display a pop-up menu.
Step 2. Click “Give feedback or report this comment” from the pop-up menu. (older versions may read: “Find Support or Report Comment”)
Step 3. Click “Spam” from the options in the next pop-up menu that is displayed.
Step 4. Click “Next”
Step 5. Click “Remove tag” in the next pop-up menu that is displayed.
(older versions may read: “Untag Yourself From This Comment”)
Step 6. Click “Done”
Step 7. The comment will be hidden, but only from you. If you would like to unhide it, click the ellipsis that appears where the comment used to be.
Step 8. Click “Unhide” when the greyed out comment appears.
1. Visit a LinkedIn Profile.
2. Scroll Down to Skills & Endorsements.
3. Click or tap the plus sign next to any skill listed to endorse someone for that particular skill.

When you create an account on LinkedIn, the default website address of your public profile is: https://www.linkedin.com/in/yourname – followed by a string of random numbers.
Not attractive. Or easy to remember.
Here’s how you can delete those numbers:
1. Log into LinkedIn.
2. Click the Drop Down Arrow to the Right or the Word “Me”
3. Click “View profile” on the Drop Down Menu.
4. Click “Edit public profile & URL.
5. Click the Blue Pencil next to your URL.
6. Customize your URL and Click Save.

Sometimes the smallest computer tip escapes me because I’ve known and used it for so long, but today, I helped someone create a Table of Contents for a document and when I turned on Show/Hide paragraph marks, check out what I saw on the page my client had reserved for the TOC:

I didn’t count the hard returns, but suffice it to say this is NOT the best way to get a new page. In this particular situation, as soon as the Table of Contents is generated and fills the page, ALL those hard returns will have to be deleted.
In the broader scope of document editing, anytime someone presses the Enter key multiple times to get to the next page, all those extra hard returns will have to be deleted when the document is edited and pagination changes. When this method of getting to a new page is used multiple times throughout a document, editing can easily turn into a circular game of adding and deleting hard returns every time text is added or removed.
With the paragraph marks shown, it looks like this:
 >
>
I’ll address all the unnecessary spaces and tabs after the word ARTICLES in another post.
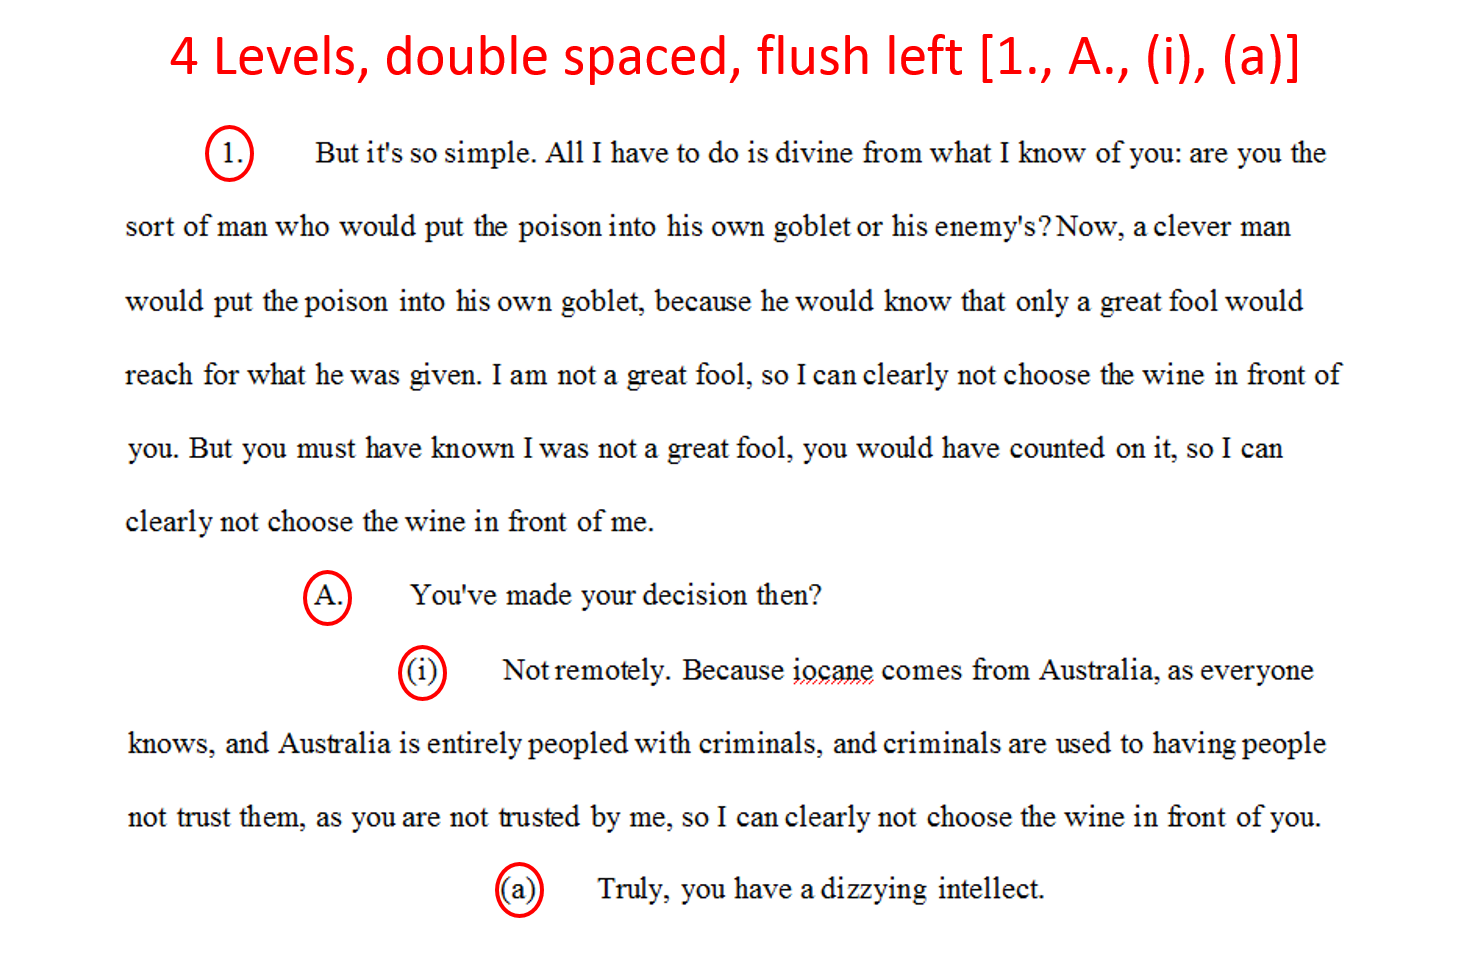
Below is an example of a basic 4 level, double spaced, flush left outline:
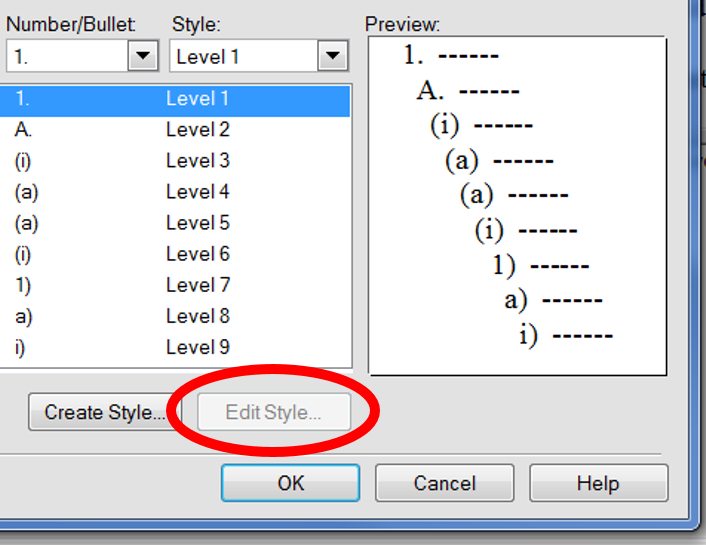
But suppose you wanted to change your outline format from flush left paragraphs to indented paragraphs? If you are comfortable with WordPerfect Bullets and Numbering, you might click “Outline” in reveal codes or “Modify” in the Property Bar to open the “Create Format” dialog box to display settings for the active outline:

So far, so good. But when you look more closely, you’ll see that the “Edit Style” button is grayed out. Unavailable.
that’s inconvenient.
But there’s another way. Actually, TWO other ways. Check it out:
Continue reading “WordPerfect: How to Change Outline Format when “Edit Style” is Grayed Out”
I admit, I like Windows 10, but there are a few settings that tend to annoy me because they exploit the everyday user’s unfamiliarity with Windows 10 in order to push built-in Windows 10 apps on the unsuspecting. One of those settings designates the Windows 10 Mail application as the default mail application – even after Outlook has been installed.
[Just to clarify: When you are reading an email in Outlook and you click “Reply” you get a new email Window in Outlook. That’s not the issue.]
Here’s how this setting can cause you problems: When you click an email link on a web page – or even an email link within the body of an email you may be reading in Outlook, instead of opening the new email window in Outlook, Windows 10 will open a new email window in its own email application.
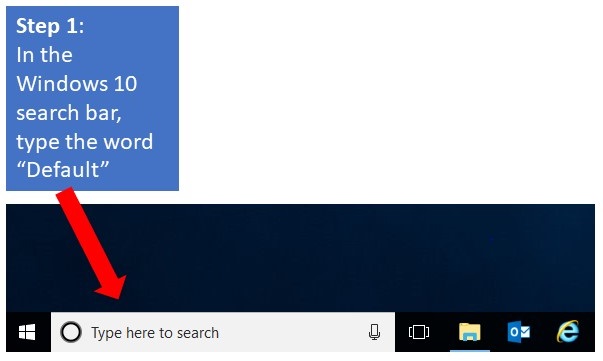
If you’d like all new email windows to open in Outlook, follow the 3 steps below to change your Windows 10 default mail application to Outlook.
1. In the Windows 10 search bar, type the word “Default” and the window should expand upwards displaying “Default app settings”
2. Left-click “Default app settings” and a window showing your Default Apps should appear with “Email” at the top.
3. Left-click somewhere over the envelope icon and select the email program you prefer.
(see the images below for more help and
click any image to view it larger on its own page)
When you begin typing, a menu similar to the one in the image below should pop up above the search bar.

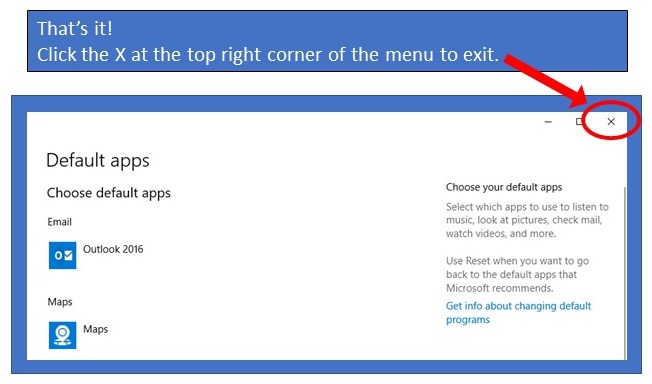
After you click “Default app settings” you should see the following menu displaying the Mail icon under the word “Email”:

If you hover your mouse over the Mail icon, it will be highlighted with a gray bar as in the image below:

When you left-click anywhere on the gray bar, a menu will open similar to the one in the image below. Just click the email application you prefer (in this example, I’ve used “Outlook 2016”) and you’re done!

Hopefully, a Windows 10 update won’t hijack that setting and make you do this again. 🙂
Type the following code in your “contact” page or wherever you want your contact information to appear on your website:

Copy the code below, paste it in a text file and edit the content in red:
(You can use any text editor, like the Notepad app in Windows.)
<!– Begin
// NOTE: If you use a ‘ add a slash before it like this \’
// NOTE: to turn any code into a comment, type two forward slashes //
in front of the line of code
// NOTE: I left the css code in, but you would need to create it in your own style sheetdocument.write(‘<span class=”phonetitle”><nobr>’);
document.write(‘Your Name Here‘);
document.write(‘</nobr></span><br>’);
document.write(‘10901 Your Street<br>’);
document.write(‘City, ST 12345<br>’);
document.write(‘PHONE: <span class=”phonetitle”>(555) 555-5555<BR></span>’);
//document.write(‘<br>’);
document.write(‘EMAIL: <A HREF=”mailto:yourown@emailaddress.com” class=”link”>yourown@emailaddress.com</a><br>’);
// End –>
Name the text file “phone.js” and save it in the same folder as the file containing the first code.
Now, your email isn’t underlying text that’s easily found by scammers and spammers, it’s buried in code. The downside is that anyone who’s not running javascript can’t see your content – rare, but possible.
Caveat: If your website is hosted on WordPress.com, they don’t allow javascript, so this code won’t work for your site.
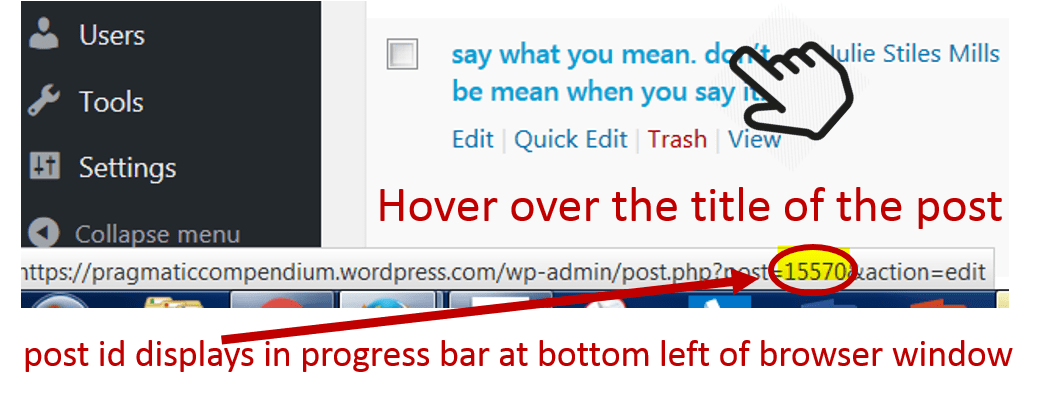
When I’ve used the [display post] feature of wordpress, I sometimes need to find an id number for a particular post. There are two quick, easy ways to find the post id:
1. If you’re logged into your WordPress dashboard, click Posts > All Posts. Find the post you need and hover or roll your mouse over the title. The post id number will appear in the progress bar in the bottom left of the browser.

2. If you are editing a post, it’s displayed in the URL.

Hope this was helpful!
 The problem:
Creating a text link seemingly inserts a line break and causes the text following the link to wrap to the next line. Notice the second paragraph is not a link – and it doesn’t wrap.
This is what the original code looks like:

To prevent the text from wrapping/inserting a line break, add an inline property to your anchor tag.
Here’s what the inline property looks like:

 And here’s the result:
I know the font size of the link is slightly larger than the paragraph text. I’ll be fixing that next.