Need a New Page? Don’t Hit Enter Till You Get One, Hit CTRL+Enter

Sometimes the smallest computer tip escapes me because I’ve known and used it for so long, but today, I helped someone create a Table of Contents for a document and when I turned on Show/Hide paragraph marks, check out what I saw on the page my client had reserved for the TOC:

I didn’t count the hard returns, but suffice it to say this is NOT the best way to get a new page. In this particular situation, as soon as the Table of Contents is generated and fills the page, ALL those hard returns will have to be deleted.

In the broader scope of document editing, anytime someone presses the Enter key multiple times to get to the next page, all those extra hard returns will have to be deleted when the document is edited and pagination changes. When this method of getting to a new page is used multiple times throughout a document, editing can easily turn into a circular game of adding and deleting hard returns every time text is added or removed.

Instead of pressing the Enter key over and over and over and OVER again, try pressing the keyboard shortcut “CTRL+Enter” to insert a page break at the location of your cursor.

With the paragraph marks shown, it looks like this:

>

I’ll address all the unnecessary spaces and tabs after the word ARTICLES in another post.

WordPerfect: How to Change Outline Format when “Edit Style” is Grayed Out

Below is an example of a basic 4 level, double spaced, flush left outline:

But suppose you wanted to change your outline format from flush left paragraphs to indented paragraphs? If you are comfortable with WordPerfect Bullets and Numbering, you might click “Outline” in reveal codes or “Modify” in the Property Bar to open the “Create Format” dialog box to display settings for the active outline:

So far, so good. But when you look more closely, you’ll see that the “Edit Style” button is grayed out. Unavailable.

that’s inconvenient.

But there’s another way. Actually, TWO other ways. Check it out:
Continue reading “WordPerfect: How to Change Outline Format when “Edit Style” is Grayed Out”

free downloadable Letterhead and Memo icons

After decades of allowing users to draw and edit tiny little toolbar icons using the built in icon editor of WordPerfect, the latest release – WordPerfect X7 – has replaced the “edit” button with an “import” button.

it’s a sad click-and-drag coloring day.

BUT. If you still have an older version of Wordperfect, don’t uninstall it! You can create and edit icons for import in WPx7.

Just create your masterpiece as usual, and then
1. Click the Copy button at the bottom of the WordPerfect icon editor
2. Open the Paint program that comes pre-installed on every Windows machine
3. Paste (CTRL+V for you keyboarders out there)
4. Click “Crop” in the toolbar (the pasted image should already be selected after pasting) and
5. Save the icon with the .png extension.

Then when you see that “import” button as you customize your WordPerfect x7 toolbar, you can import your custom creation. The image should be a 16 x 16 pixel .png image and icons created with previous versions of WordPerfect are exactly the right size.

Two icons that I used regularly over the years were for Letterhead forms and Internal Memo forms. Here are a few in different colors. Just right click to save the image.

iconlhblack

iconlhblue

iconlhgreen

iconlhorange

iconlhpink

iconlhpurple

iconlhred

Save

iconimemoblack

iconimemoblue

iconimemogreen

iconimemoorange

iconimemopink

iconimemopurple

iconimemored

“Print” Button Grayed out in WordPerfect Print Dialog Box?

The first and most obvious reason the “Print” button would be grayed out is if you are trying to print a blank document. It happens. We get busy, we speed up, a Ctrl+F6 or a Ctrl+N sneaks in just before a Ctrl+P and the next thing we know, we have a gray Print button.

So…Question #1: Is there anything in your document? Text? a Text Box? an Image? Bueller?

I realize that’s the equivalent of asking you if your computer is plugged in and I apologize if you’re giving your monitor the stink eye right now, but we needed to eliminate that possibility right up front.

Moving along.

If your document isn’t empty, then follow these steps:
Continue reading ““Print” Button Grayed out in WordPerfect Print Dialog Box?”

Troubleshooting WordPerfect Publish to PDF.

Is WordPerfect PDF only publishing the current page of the document unless you select/highlight the entire document text?

The Fix:
1. In WordPerfect, click File, Publish to PDF.
2. Select “Settings . . . ” in the bottom right corner of the dialog box.
3. Change the “Export range” to “Full Document” and click “OK” to save the new setting.
4. Cancel the “Publish to PDF” menu and, as an extra precaution, exit WordPerfect to make sure the change holds.
Continue reading “Troubleshooting WordPerfect Publish to PDF.”

printer tshooting with WordPerfect

Every once in a while, I dig into WordPerfect to disable a little known setting:

“Reformat documents for the WordPerfect default printer on open”

This eliminates a few different problems, two of which come immediately to mind:

1. Older WordPerfect documents won’t open correctly in a newer version of WordPerfect.
2. Existing documents won’t print to the correct paper trays, but new documents will.

Sometimes an error message will indicate a missing (and OLD) print driver, sending someone on a quest to find it. When it’s found and loaded on a new machine, WordPerfect can open the document.

That’s a good workaround, but sometimes an old printer driver can’t be found or and/or old universal drivers won’t do the trick. I wouldn’t be surprised to see more of this type of issue since HP isn’t making Windows 7 64 bit drivers for their old printers.

Try this instead: Click Tools, Settings, Environment, 2nd check box – UN-check “Reformat documents for the WordPerfect default printer on open”

WordPerfect SWITCH and CASEOF

In generating a WordPerfect merge document, one of my clients wanted to type an acronym for a plaintiff ONE time and have the merge process insert many different things in the document, based on that one, shortened client reference.

Let’s look at how to do that. The code looks like this:

(click to zoom any image)

Step 1. In the process of setting up the WP merge, a data field was created for the plaintiff, named “Plaintiff Short.”

This particular merge form was only used for three clients, so the example is limited to three. Keep in mind, you can have more or less.

Here’s the code as it appeared in the WP merge form document:
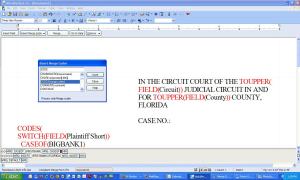
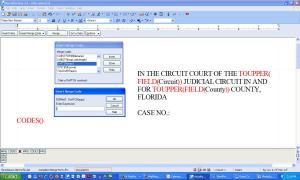
CODES(
SWITCH(FIELD(Plaintiff Short))
CASEOF(BIGBANK1)
INSERT(The Big Bank of Central Southeast, a Florida corporation)
CASEOF(BIGBANK2)
INSERT(Small Town Bank, a Florida corporation)
CASEOF(CREDITUNION)
INSERT(The Friendly Local Credit Union, a State Chartered Credit Union)
DEFAULT
KEYBOARD(Please the Name of the Bank and Click “Continue”)
ENDSWITCH
)

Note: You can’t just type this code. Here’s how to insert the code into your form document.

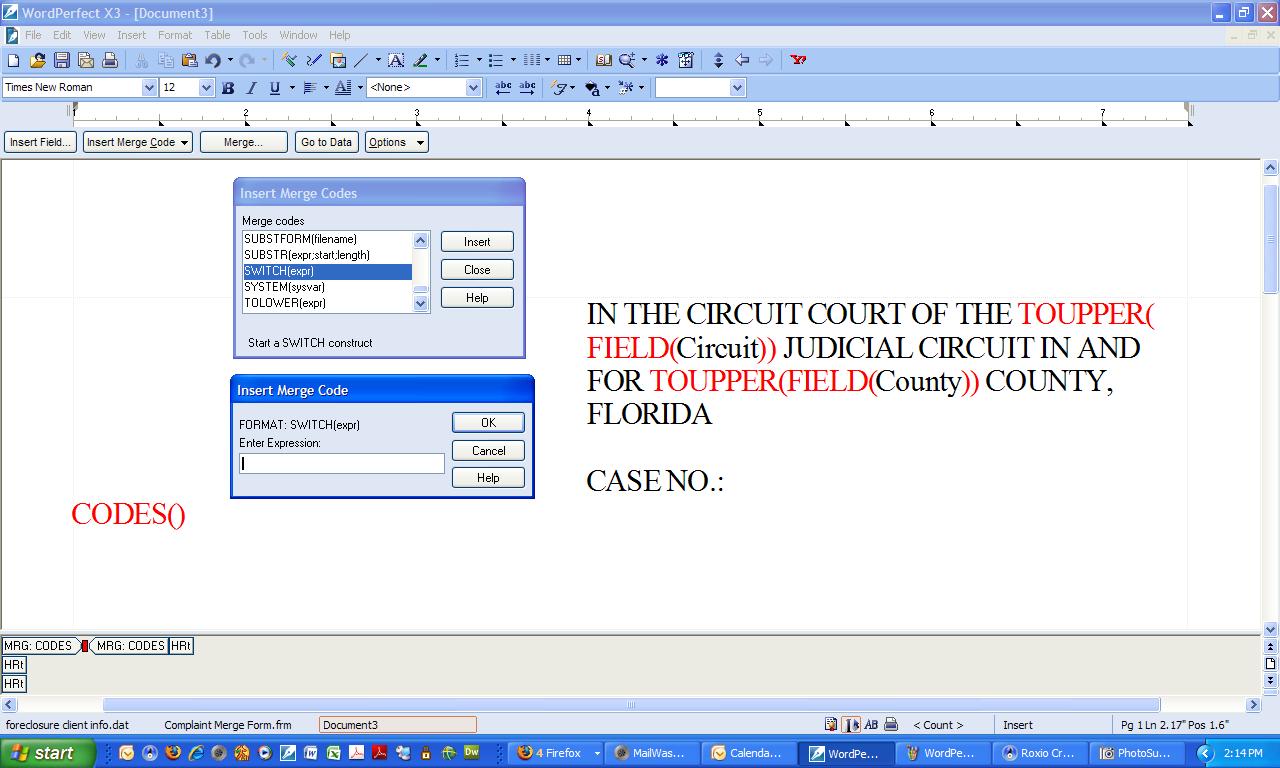
Step 2. Open the merge form. In the Merge subtoolbar, click the “Insert Merge Code” button and select “More . . . ” The following dialog box appears:

The first code I insert is “CODES(merge codes)” which ignores hard returns and spaces between its parenthesis. With my cursor between the parenthesis of the CODES() merge code, I press enter to insert a hard return and place my cursor on the following line, so it looks like this (the cursor is shown in red):

CODES(
|)

Step 3. Leaving the “Insert Merge Codes” dialog box open and find the “SWITCH(exp)” merge code in the list click Insert. Another dialog box, entitled “Insert Merge Code” is displayed. I don’t enter anything and click “OK”

The code should now look like this (:

CODES(SWITCH(|))

Leave the Merge Code dialog box displayed if it doesn’t bother you, close it if it does. (I closed it so as not to confuse anyone.) Next click the “Insert Field” button on the Merge subtoolbar and select the field you need. In this case, I selected the “Plaintiff Short” field and clicked insert.

Step 4. Close the “Insert Field” dialog box. If you closed the “Insert Merge Code” dialog box, open it again by Placing the cursor on the next (empty) line, click the “Insert Merge Code” button and select “More . . . ”

Step 5. Insert the “CASEOF” code. With the cursor between the parenthesis of the CASEOF code, type the text which might be entered into the “Plaintiff Short” data field during a merge:

In this case, the text “BIGBANK1” is entered.

Step 6. Repeat step 5 as many times as needed, changing the text to be entered in each possible scenario. (In my example code above, I added an option for text entry to allow for the possibility of a new client.)

Step 7. Finish by inserting the “ENDSWITCH” merge code. The end parenthesis for the CODE command still appears and it completes the code snippet!

Step 8. One simple way to use the result of that snippet is to insert the “Plaintiff Short” field into the document everywhere the Plaintiff’s acronym should appear, but there are lots of other possibilities!


Want to learn more? Visit www.pragmaticcom.com and schedule a training session!

viewing invisible grid lines

Can’t see the grid lines for labels or margins in WordPerfect? It could be a problem with Windows and flatscreen monitors. (Corel’s support database – Answer ID 207679) Try this:

For Windows XP:
1. Right click on the Desktop, select Properties.
2. Select the Appearance tab.
3. Click the Advanced button.
4. Select 3D Objects in the Item dropdown.
5. Under Color 1, choose a darker shade of gray.
6. Click OK, then click Apply on the Appearance tab.
7. Click OK, and open WordPerfect.

For Windows Vista:
1. Right click on the Desktop, select Personalize
2. Click on Window Color Appearance
3. Click on Open Classic Appearance
4. Click the Advance button
5. Select 3D Objects in the Item dropdown
6. Under Color 1, choose a darker shade of gray.
7. Click OK, then click Apply on the Appearance tab.
8. Click OK, launch WordPerfect.

The grid lines should be more visible. (The darker the shade of gray you select the more visible the grid lines will be.)

WordPerfect Auto Numbering Made Even Easier!

Let’s break this up into three parts, shall we?

1. How to use a custom outline/auto paragraph numbering macro I may have written for you.
2. Tips for working with the WordPerfect auto numbering/outline feature.
3. Issues with using auto numbering when allowing MS Word users to edit your document.
__________

Part 1: Using Pragmatic Macros

To format any document with a custom auto numbering style using a WordPerfect macro written by me:

1. Place the cursor where you want the numbering to begin or at the top of the document. (I always put it at the top of the document so it’s easy to find later.)

2. Play the macro. Depending on your preferences, I’ve either given you a shortcut key (ALT+O) or placed a button on your toolbar which shows a I.A.1. descending top left to bottom right of the button. So either type your shortcut key or click your button. The screen will flash a few times and insert the first number at the location of the cursor. If you don’t need a number in that exact spot (like at the top of the doc), turn it off with “CTRL+H”

3. Once the macro has been played in a document and the document has been saved, the macro never needs to be run in that document again. (Unless you accidentally delete it – another reason I place it at the top of the document instead of placing it at the first numbered paragraph).
__________

Part 2: TIPS for Working with Auto Paragraph Numbering: Continue reading “WordPerfect Auto Numbering Made Even Easier!”

Sweeet New Corel Product for Collaboration!

Corel WordPerfect Lightning!

I’m still exploring this new software to discover everything it can do, but one of the sweetest things is this:

It opens any PDF, Word or WordPerfect document for viewing, printing and . . . copying into a note – which can be easily edited and then automatically inserted into an email. Continue reading “Sweeet New Corel Product for Collaboration!”

%d bloggers like this: